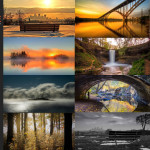
PANORAMIC CLOSE-UPS — MULTIPLE CAPTURE © Craig Blacklock
The Purpose: To extend the DOF beyond what is possible with a single capture, and produce a panoramic image. This is usually done to produce a wider than normal horizontal image, but it can also be done to make vertical images, or square or other traditional height to width ratios. In these cases, multiple rows of captures are done to make higher resolution outputs for bigger prints with more detail.
When it can be used: •Wherever it would be appropriate to use a stacked- focus technique to extend DOF, and you want to extend the boundaries of the image beyond a single capture.
Camera settings:
RAW
Manual
Mirror locked up
Self timer set to 2 seconds or remote shutter release.
Limiting factor:
Works best with longer lenses. Ideally you should have a pano head for your tripod, but a focus rail can also work. You just need to get the camera positioned so the front portion of the lens is over the pivot point of the tripod. If you are doing panos of flat subjects, this is not nearly as important. You can also leave your camera in place, and drag the subject across the composition a bit at a time (assuming it is moveable).
Capture process:
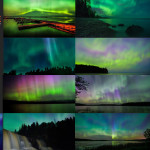
Panoramics traditionally, are long horizontal images. But, the same techniques can be used to create verticals, or square images where you want multiple captures to raise the resolution for making larger prints. Combining this with previous techniques we’ve discussed, you can make extremely sharp, very large prints, far beyond the quality you could get with a single capture.
Any of the techniques we’ve previously covered can be incorporated into a panoramic image (such as extended DOF). If using multiple capture techniques,
treat each composition as its own image first, then composite the flattened images last.
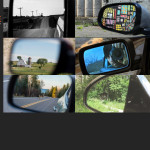
To capture the panoramic images, start by getting the camera positioned so the front nodal point of the lens is over the pivot point of the tripod. You can test the exact position by lining up a near object against a distant one. If the lens is in the right place, the two objects will stay in line as you pivot the camera on the tripod. To do multiple row panos you have to align not only the horizonal pivot, but also the vertical. You will need a multi-row pano head made for this purpose, although if your subject is pretty flat and you use a longer lens, it will work without one.
Once your camera is positioned correctly, start by photographing the left end of your composition, making as many captures as needed for depth of field. Then pivot to the right, leaving about a 30% overlap. Make another set of captures and repeat until you reach the right end of the composition.
Computer processing:
Process all images as required by the focus technique you are using. If you are using single-capture techniques, process in ACR and click DONE. If you are using multi-capture techniques, save a set of flattened TIFFs or PSDs to a project folder (usually the output images are done in Helicon Focus).
Then…
Highlight the entire set of output images in Bridge or Lightroom. Then go to the top of your screen and go: TOOLS>PHOTOSHOP>PHOTOMERGE. In the pop up menu click Automatic Projection Method and Blend Images Together. Then click OK. When it is done you will see the finished panoramic with each image on its own layer with a mask in the layers pallet. Make any adjustments if needed. Then flatten and save.
Photomerge does an amazing job of lining up and blending images. You can even shift focus and exposure when creating your source images. However, you will likely end up with the image warped in some pretty strange ways, and just cropping may cut off some things you really wanted to include.
To fix this you can use the warp tool to bring those back into your composition before cropping. First flatten the image, then go COMMMAND/CONTROL+A to highlight the entire image. Then EDIT>TRANSFORM>WARP. This gives you a grid with handles on each intersection that you can move around to warp the image. Once you get it where you want it, hit return and then do your final crop and save. If you want to adjust a smaller area than the warp tool will allow, select an area around it and use the Liquify filter FILTER>LIQUIFY. Use the top tool to push the image to where you want it. In CS5 you now have Puppet Warp as well. If there are small areas of white left inside the area you want to crop, try selecting them and using EDIT> FILL>CONTENT AWARE.